Saturday, March 21, 2015

Homemade Sweet Potato Gnocchi with Creamy Baby Bella Sauce

Ok, folks, let's take a quick poll.  Raise your hand if the thought of homemade pasta intimidates you. Oh, most of you? Alright, now raise your hand if you don't know how to pronounce that weird potato pasta, gnocchi. Oh, all of you? Well, it's high time that we set things straight in the world of Italian pasta.  First of all, that funny word is pronounced \ˈn-kē. Don't worry, I had to Google it too. Secondly, making pasta may be more time consuming than tossing the boxed variety into a pot of boiling water, but it is also much more satisfying.  And the great thing about gnocchi is you do not need any type of fancy pasta machine to make it.  All you need is a bowl, a spoon, and some hands ready to get a little sticky. 


I had my husband's help in making this pasta, which made it all the more fun. If you are looking for something relaxing and enjoyable to do with your significant other or a friend, try rolling some gnocchi.  Kneading the soft, fluffy dough is a great stress reliever.  Plus, it will make you feel like an Italian nona. 

I'm no pasta professional, but I have been working at perfecting my pasta game and here are some things I have learned along the way.  Add as little flour as possible when whipping up your dough.  It will make your hands and countertop sticky, but embrace it.  It will make the difference between beautiful little bites of heaven or chewy rubber nuggets. Also, when your homemade pasta rises to the top of the pot of boiling water, take it out.  Don't second guess whether it is done or not. It's done. Lastly, a killer sauce is always necessary to take your pasta to the next level.  

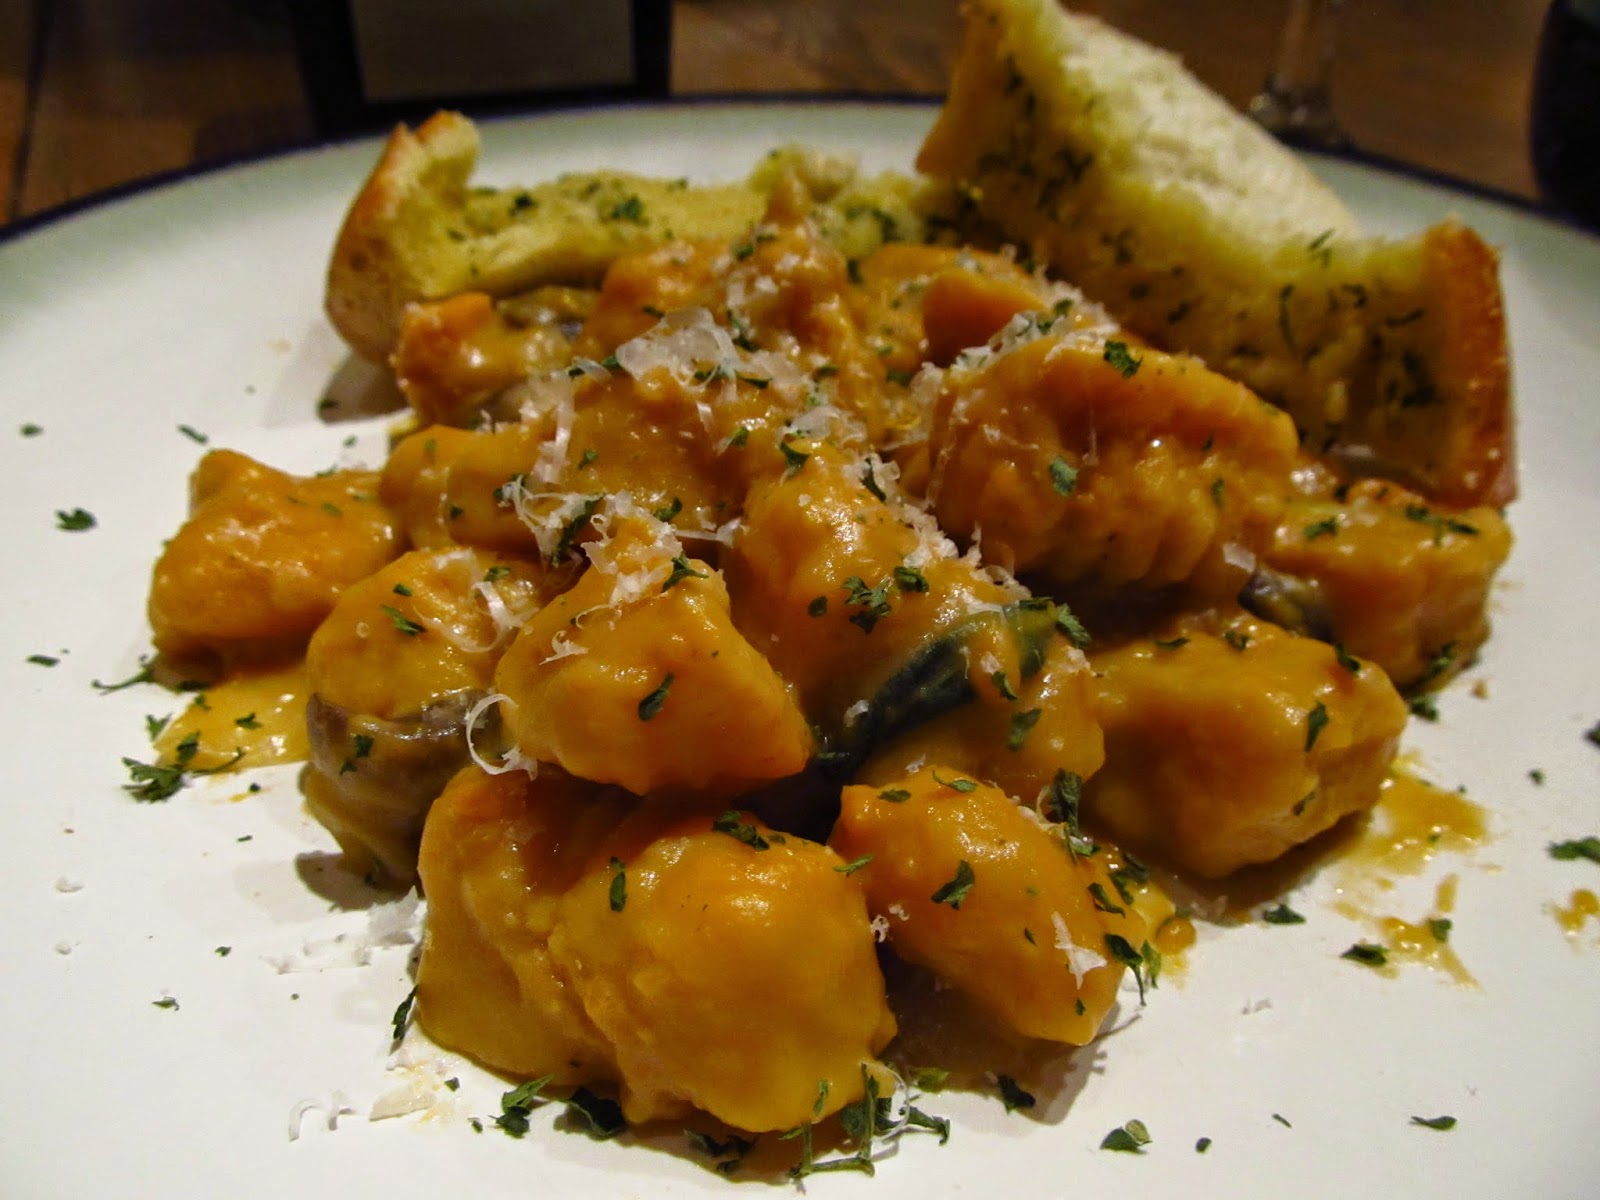
The mushroom sauce that I made with the sweet potato gnocchi was warm and creamy and comforting, the perfect compliment to the orange root veggie and the pinch of nutmeg mixed into the dough. This dish was full of those warm notes reminiscent of cold weather. In the summer, I might make this gnocchi with regular potatoes and a lighter, fresh sauce.  Savor this meal with a fresh green salad and a good glass of red wine. 

Compliments to Parsley, Sage, and Sweet for this lovely recipe. 

Ingredients

Gnocchi

  • 2 cups mashed sweet potato (about 2 medium sweet potatoes)
  • 1 egg
  • 2-3 cups all-purpose flour
  • 1/2 teaspoon salt
  • 1/4 teaspoon nutmeg

Creamy Baby Bella Sauce

  • 1/4 cup butter
  • 2 chopped shallots
  • 1 pint sliced baby Portabella mushrooms
  • 8 julienned fresh sage leaves
  • 1/4 cup fresh grated Parmesan
  • 1 cup low sodium beef or chicken stock
  • 1/2 cup mashed sweet potato
  • 1 cup of cream (If you are trying to cut fat and calories, use 2% milk like I did.  You will simply need to add a little flour to thicken it up)

Directions

  1. First thing's first - peel and slice the sweet potatoes and get them boiling.  As soon as they are soft, drain and mash. I used a food processor to quicker, more creamy results. 
  2. Combine sweet potato, egg, salt, and nutmeg in a large bowl and mix well.  Then, add 1 cup of flour, adding small amounts of flour after that until you reach a dough that is soft and smooth but still slightly tacky. 
  3. Lightly flour a work surface and knead your dough until you have a soft, springy ball (this will take 2-3 minutes).  Then, cut the ball into quarters.  Working one quarter at a time, roll the dough into a long rope about 1/2 inch thick and cut into 1/2 inch pieces.  
  4. If you're pressed for time, you can skip this next step, but I personally think it adds flair to your pasta.  Take a fork and press it into the gnocchi, giving it small ridges.  You may have to reform the pasta pieces a bit after doing this. 
  5. Now, in small batches, drop your gnocchi into a pot of boiling water.  After about 2-3 minutes, the gnocchi will begin to rise to the top.  Use a slotted spoon to remove from water and set aside. 
  6. Meanwhile, start your mushroom sauce.  Melt butter over medium heat, then saute chopped shallots until they become golden, about 5 minutes. 
  7. Add mushrooms and sage and stir constantly until mushrooms are tender.  Then, add sweet potato, chicken stock, cream or milk, and cheese, and bring to a boil.  Reduce to low and allow sauce to simmer until pasta is ready. 
  8. Once all of the gnocchi has been cooked, stir into mushroom sauce until covered and heated through. Then, spoon onto a plate and garnish with freshly grated Parmesan and parsley. 
This dish was utterly delicious.  I paired it with this spinach, arugula, strawberry and goat cheese salad and a slice of garlic bread.  Prepare to wow with your homemade pasta, and fear it no more! 

Love and eat well,

Deidre

Thursday, February 12, 2015

Mediterranean Roasted Chicken: Getting Your Healthy on for Valentine's Day

When you think Valentine's Day, I bet you think chocolate mousse, sparkly champagne, and maybe a really good steak.  Layers upon layers of indulgence. And there's nothing wrong with that.  In fact, all of that is really quite delightful.  But recently I've become fascinated with Mediterranean cooking, and have spent the last few days pouring over cookbooks and Pinterest in search of new, healthier recipes that have their own indulgent charm: think savory olive oil, soft mozzarella balls, and fresh oregano, basil, and parsley.  Holy, sexy! Right?

Ok, so maybe I'm alone in thinking eating cheese drizzled in olive oil is sexy. But I don't think I am.  Even if so, I have no doubt that you and your honey will drool over this recipe. Caramelized red onions, grape tomatoes roasted to the point of explosion, tender marinated chicken mingling with salty artichokes and perfectly melted mozzarella... shall I go on? You. Will. LOVE. This. Recipe. Almost as much as you love the person you're sharing it with.

And you know what else? It's easy. Like... two pan easy. Yep, dig the roasting pan out - it's time to get your Mediterranean on.

Compliments to The Clever Carrot for this killer recipe.

Ingredients:

Marinade

  • Juice from a 14 oz. jar of marinated artichoke hearts
  • 2-3 minced garlic cloves (do you have a garlic press? it will revolutionize your world)
  • Leaves stripped from four oregano sprigs
  • 1 1/2 pounds boneless chicken breasts (thighs would be delicious too!)
Roast
  • 2 Tbsp olive oil, divided
  • 1 small red onion, sliced thinly
  • 1 pint grape or cherry tomatoes, whole
  • 1 14 oz. jar of artichoke hearts
  • 1 14 oz. jar of white beans (I used cannellini), drained and rinsed
  • 1/4 cup chopped Kalamata olives (only if you like 'em - we don't so I just left them out)
  • 1 8 oz. tub fresh ciliegine (cherry-sized mozzarella balls)
  • Ground black pepper
Garnish
  • 1/4 cup chopped parsley
  • 2 Tbsp basil leaves, cut into ribbons

What You Do:
  1. First thing's first - you've gotta get that chicken marinating! Drain artichokes and reserve the juice, putting it into a large plastic bag.  Add the chicken, oregano, and garlic and rub it all together. Then seal bag and refrigerate for at least an hour and up to 3 hours. 
  2. When you are ready to start roasting, preheat the oven to 400 degrees F. Add sliced onion and tomatoes to a large roasting pan and drizzle with 1 Tbsp olive oil.  Roast for 15-20 minutes, or until onions are soft and the tomatoes are on the fringe of bursting. 
  3. Meanwhile, prepare the chicken by heating remaining olive oil in large pan over medium heat.  Brown both sides, then remove to a plate.  The chicken won't be cooked all the way through. 
  4. Once the onions and tomatoes are done roasting, pull the pan out of the oven and add chicken, beans, artichokes, and olives if you choose. Cook for 7-10 minutes, or until your chicken is completely cooked. 
  5. Turn the oven off and add ciliegine and parsley and basil to the pan, choosing to add as much ciliegine as you like. Then, pop in back in the oven for a minute or two, just to warm the cheese up a bit and bring the flavors out of the spices. 
  6. Serve with a light leafy salad (I made a spinach, pear, and strawberry mix) and homemade bread if you want to really indulge!

My husband took a slow, hesitant first bite.  He'd never eaten artichokes naked before - that is, outside of Applebee's spinach artichoke dip. He paused... considered... then said, "It's delicious." I naturally agreed.  He went back for seconds and I loaded my plate with extra ciliegine and bursting tomatoes. The jury is out, folks - cheese is sexy, and so is everything else in this pan, which makes this the perfect recipe for your Valentine's Day weekend. 

Sending much love and happy eats your way,

Deidre

Thursday, October 2, 2014

Spicy Sausage, Butternut Squash and Caramelized Onion Pizza topped with Sauteed Sage and Garlic

Who doesn't love pizza? I can say with all honesty that I have never yet in my life met a person who has told me, "Ew, I'm not into pizza." There is something about the chewy comfort of the crust, the melty gooeyness of the cheese, and the sweet spiciness of a sprinkling of toppings that really feeds the soul, you know? Furthermore, anyone can feel successful making pizza. If baking is a science, then cooking is an art - and there is no better food to get artistic with than pizza. Layer! Load! Experiment!

Since it is now officially autumn, hard squash has become the new star in my kitchen. Butternut, acorn, pumpkin, delicata - it's all inspiration for fall-flavored dishes. My squash obsession has rendered some pretty interesting entrees in ghosts of kitchen past, but never so interesting as the pizza which I made for this post. Lightly oiled and roasted butternut squash, sweet caramelized onions, spicy sausage, white cheddar cheese, and crispy sage and garlic come together over a beer-flavored crust in this recipe. My husband loved it so much that I had to sneak a piece away so I'd have lunch the next day before he ate it all.

Inspiration for this recipe found at Oh My Veggies

Ingredients:
  • Premade pizza dough ball (I used Portland Pie Company's Beer Dough-way better than my homemade!)
  • 1/2 butternut squash
  • 3-4 tbs olive oil
  • 1 large onion
  • Salt and pepper to taste
  • 2 sausage links (removed from casings)
  • Fresh sage
  • 1 garlic clove
  • 1/2 cup white cheddar cheese
Directions:

  1. Preheat oven to 400 degrees Fahrenheit. Peel and halve butternut squash, then chop into small cubes. You will only need half of the squash - I cut up the other half and put it in the fridge for the next night's meal.  Then, put into a  9 x 11" baking dish and drizzle with olive oil and salt and pepper.  Shake to make sure all the squash is evenly coated. Cook uncovered for 45 minutes. 
  2. Now it's time to caramelize the onions. Chop the onion in thin slices and cook in 2 tbs olive oil over low heat in a covered saute pan for one hour. Stir occasionally until onions begin to brown, then stir more frequently to avoid burning. 
  3. While the onions and squash cook, brown sausage in a small pan over medium-low heat. Set aside.
  4. In another small pan, saute the sage and garlic until just crispy. Set aside. 
  5. Use a rolling pin to roll out the pizza dough over a pizza stone. Brush lightly with olive oil. When the squash and onions are cooked, top the dough with cheese, sausage, onion, and squash. Then add a little more cheese - why the heck not? Cook for 18 - 20 minutes.
  6. Before serving, top pizza with the sage and garlic. Then, bon apetit! 
This pizza is so good, I think I could eat it at least 3 nights in a row. The roasted squash and caramelized onions are totally worth the extra TLC they require to make this pie truly incredible. Give it a try and let me know what you think!

Eat well, always,

Deidre

Wednesday, August 20, 2014

Home-Grown Tomato Sauce: From Garden to Stovetop to Pantry

This year I grew my very first garden. If you have read the Gourmet Weekday recently, then you have probably seen a photo or two of my highly prized veggies. I have been nurturing these plants since May, first as tiny seedlings which cluttered all of the windowsills inside my home, then as fragile sprouts left to weather the elements outside after I planted them, and finally as fully grown plants which are producing - well, the fruits of my labor. 

If you can't tell, I have become very attached to my garden. Of course, nature happens (so do inexperienced gardeners), and many of the plants have died before their time. I lost most of my zukes and summer squash to a beetle invasion, and an entire row of string beans got eaten by a gopher whose time on this earth is limited, if I have anything to do with it.  And it nearly broke my heart when I went outside after one of last week's violent storms to find two of my tomato plants uprooted, and the tomatoes smushed into the mud with creepy beetles crawling all over them. 

Still, I have been so blessed with a bountiful garden. Despite the tomato plant disaster, I still have an entire row of tomatoes which are growing, growing, growing. Heirlooms, Beefsteak, Cherries, Romas. They are producing faster than this little husband-wife duo can consume! 
 I have given some away to friends and chopped tons up and thrown them into every meal I've made, but I am still swamped with them. I couldn't stand to see a single tomato go to waste. So I did what any self-respecting gardener-in-training would do and I asked my mom how to can stuff.

My mom sent me home with her water-bather, which is used to boil and seal canned goods.
 The thing is huge. After I was done using it, I had to have my husband put it in the bathtub to cool so I could use the stovetop to cook supper!  Now, this was my first time ever canning something, and I haven't tried out the canned sauce yet, so for this blog's purposes, let's just focus on the making the sauce part. 

An American in Sicily wrote a wonderfully simple recipe for homemade tomato sauce, and this is the one which I followed to make my sauce. The entire process took about 2 1/2 hours, but once you make a big batch of homemade sauce (skip the whole canning process altogether if you'd rather and just freeze it), you will have it on hand for pastas, pizzas, and dipping for weeknights to come. This is a good Sunday afternoon project, and it will make your entire kitchen smell incredible. 

So let's get started!

Ingredients
  • TONS of fresh tomatoes. I hear Romas make a great sauce, but I just used a mixture of whatever I had on hand from my garden. I also didn't weigh the amount of tomatoes I used - just eyeball it, people :)
  • 1 cup olive oil
  • 1/2 cup red wine
  • 1/3 dried herbs. I used basil, oregano, thyme, and rosemary.
  • 4-6 dried bay leaves
  • 6-7 minced garlic cloves
  • Salt
Directions
  1. First thing's first: you have to chop up all of those tomatoes. In retrospect, I realized that it would have made much more sense to peel the tomatoes and also remove their seeds to avoid unwanted chunkiness that was difficult to strain. So do that, and then chop. Throw the chopped tomatoes into a large stockpot. 
  2. Next, add all the other ingredients to the pot.

  3. Mix the ingredients together with a wooden spoon. Then, use a potato masher to mash up the large tomato chunks.
  4. Cover, then bring the mixture to a boil.  Once the sauce is boiling, reduce heat to low and allow the sauce to simmer for 2 hours, stirring occasionally. Remove the cover for last 20-30 minutes, which allows the sauce to thicken some. 
  5. For this next step, a tomato strainer would come in very helpful. However, as an amateur sauce-maker, the best I could come up with was a strainer in a bowl. I say do what you gotta do. Carefully pour the sauce into strainer and, using a spatula, push the sauce through the strainer.                                                                                                                              
                                                                                                                                                          This will remove some of the large peels from the sauce. Straining for me was difficult, both because I didn't have a tomato strainer and because I didn't peel my tomatoes. Luckily my husband and I like our tomato sauce chunky!
  6. Once you strain your sauce, taste test it. Does it need salt? More garlic? More wine? Maybe you'd like to add some onions before you add it to tonight's meal? Make these changes, and reserve what sauce you need for the meal at hand. Jar up the rest, and freeze or can it. 
I served my home-grown tomato sauce over a place of linguine with baked meatballs and a side of no-knead whole wheat bread. It was delizioso! How will you serve your sauce? Share your ideas and comments below!

Happy Saucing,

Deidre

Thursday, August 7, 2014

Summer Steak Tip Salad with Dijon Dressing

Honesty is the best policy, so I think it's only right that I be straight up and tell you that this post was actually supposed to be for a different salad.  This salad included chunks of caramelized pears and pecans, crumbles of Gorgonzola, and spicy little baby arugula (my new favorite green!). It looked incredible and super gourmet but the fact is - I destroyed it. My husband forgot to bring home the arugula, so I replaced the green with spinach. He also could not find pecans - but I had a few almonds shoved in the back of my cupboard that I salvaged. Most horrifyingly, I burnt the caramel for the pears and discovered this fact only after I dropped all of the pears into the concoction, said, "What is that vile smell?" and tasted a chunk, only to feel like vomiting. 

So... there it is. I was forced to be a little innovative last night, like we all sometimes must. Luckily, my fridge was jam-packed with fresh fruit and berries, and I was still able to make the delicious dressing that the original salad called for. 

I have found in my first year of marriage that the only sure-fire way to ensure that my husband will eat a salad without complaint is to throw some meat on top of it. This rule especially applies when the salad is the main course. For this reason, steak tips have become my best friend. They are quick-cooking, blend well with a vast variety of flavors, and are reliably delicious.  And let me tell you, I was glad to have them to hold my salad all together last night.


So here's the recipe for my new, spur-of-the-moment Summer Steak Tip Salad. Serve with the homemade Dijon dressing (original recipe here) or a light raspberry vinaigrette.

Ingredients
  • 4 cups chopped spinach
  • 1 chopped red delicious apple
  • 2 cups sliced strawberries
  • 1 cup blueberries
  • 1/2 cup crumbled feta cheese
  • 1/2 cup almonds, pecans, or walnuts
  • 3/4 lb steak tips, sliced into bite-sized pieces
  • 1 tbs olive oil
For the dressing
  • 1 tbs Dijon mustard
  • 3 tbs red wine or red wine vinegar
  • 1/2 tsp sugar
  • 1/3 cup olive oil
  • Salt and pepper to taste
Directions
  1. Heat olive oil over medium heat until sizzling. Add steak to pan and saute 2-3 minutes on each side, or until it has reached desired temperature. My husband the Spicemaster helped here, and added a secret variety of spices which he never revealed.  My advice here is to just add lots of cracked black pepper, and then anything else you love to give it a juicy flavor kick.
  2. Meanwhile, chop spinach, apple, and strawberries and layer ingredients in a large bowl. Top with the blueberries.
  3. When steak is cooked, remove from pan with tongs and transfer onto the salad. Sprinkle with feta cheese and almonds.
  4. The dressing can be made in advance, but I prefer it fresh as can be, and it's easy to whip up. Just add all the ingredients together in a small bowl and whisk together. Taste test before serving - I decided to go a little heavier on the wine (surprise, surprise) to make sure the Dijon was not too overpowering. Serve on the side or drizzle over the top of the salad. 
Much to my delight, after I served my husband a large plate of this salad (which I overloaded with steak in an effort to ease the pain of having salad for dinner), he reached back into the bowl with the tongs and gave himself a hearty helping of spinach and said, "What? I gotta get my greens." 

Despite the original salad recipe being a flop, I was pleased with the way this one turned out. The sweet and savory combination of flavors made it satisfying and summery. And my husband finished it off after devouring his first serving, scooping out every last bit of healthiness out of the bowl. And so there you have it - men can eat just salad for dinner. 

Happy cooking,

Deidre

Wednesday, July 30, 2014

Spiced Beef Tenderloin with Mango Hot Pepper Salsa - HELLO flavor!

I need to come forward with a couple of confessions before we get this recipe rolling. Confession #1: My husband brought this meat home for me from Shield's Meats in Kennebunk (best meat in the world, by the way). I asked him to get me a small beef tenderloin, which I have cooked once before and felt quite comfortable doing again. Well, just after the moments I had prepared it and popped it in the oven to roast, my husband walked inside the house. The dialogue that followed went a little something like this:

"Is that apple pie I smell?" he asked in delight.

"No, that's the beef tenderloin."

"The beef tenderloin? What did you put on it?"

 I proceeded to describe the spice rub in glowing excitement. "I know, I know - it's a little different, but - I thought I would experiment a little."

"Wow baby... I don't know if I would choose filet mignon to experiment with."

"WHAT?! THAT'S FILET MIGNON?!!"

So there it is.  I cooked an entire meal not knowing that I was using the choicest of cuts of beef, not to mention the fact that beef tenderloin and filet mignon are from the same part of the cow. Some Gourmet I am. And at that point, panic set in - I felt a new desperation for the meal to be delicious.

Confession #2: My husband and I had differing feelings about the meal. He loved it - devoured his and then finished off mine, as a matter of fact. I, however, felt it was a little funky. The cinnamon with the beef created a flavor that my taste buds had never before experienced, and I spent the whole time trying to decide if I loved it or hated it.

Confession #3: I hate cilantro. I shouldn't have used it, and you shouldn't either if you don't like the flavor. That's all.

This meal is what I would call controversial, which I believe gives it some glamour. My charge to you is this: Know that you will be cooking with some expensive beef, and if your taste buds are timid, proceed with caution. Or try this recipe on grilled chicken. If you are feeling daring, innovative, and are truly ready for a Gourmet Weekday experience, then by golly, full steam ahead.

*This recipe is loosely interpreted from Fairchild's The Bon Apetit Fast, Easy, Fresh Cookbook (2008).

Ingredients
Mango Hot Pepper Jelly

  • 1/3 cup hot pepper jelly
  • 3 tablespoons fresh lime juice
  • 2 1/2 cups chopped mango (about 2 mangoes)
  • 1 3/4 cup chopped red onion
  • Fresh cilantro (more or less depending on personal taste)
Spiced Beef Tenderloin
  • 1 tablespoon ground cinnamon
  • 1 tablespoon sugar
  • 1 tablespoon paprika
  • 1 1/2 tablespoons crushed sea salt
  • Olive Oil
  • 2 (more if serving more than 2 people) 6-ounce beef tenderloin cuts


Directions
1. Preheat oven to 425 degrees F. Meanwhile, mix cinnamon, sugar, paprika and sea salt in a small bowl to create the spice rub for the beef. Brush beef with olive oil, then cover in the rub. Once the oven has preheated, place in small roasting pan (I like to line mine with tinfoil for easy clean-up), pop spiced beef in for 25 - 30 minutes, checking for doneness. * This is easy to overcook. Use a meat thermometer and check regularly to make sure you achieve the temperature you want. *
2. While the meat cooks, whip up the salsa. Whisk the jelly and lime juice together in a large bowl, then add the rest of the salsa ingredients and mix. 

3. When the meat is nearly done cooking, top with mango hot pepper salsa and pop back in the oven to warm it up. When the meat is cooked perfectly to your tastes, pull out of the oven and serve.


While this meal looks fancy, it is surprisingly easy. The part I had the most trouble with was simply peeling and chopping the dang mango. I hear you can buy it like that in the grocery store. What a concept. I served this with a pile of mashed potatoes sprinkled with green onion and roasted broccoli and summer squash. The summer squash is pictured below because, well - it's from my garden and I think it's just the most beautiful sight. Isn't it magnificent? 

I could go on and on about the splendors of eating veggies from your own garden, but I will spare you this time. I hope that you enjoy this recipe, and would love to hear your feedback and/or adaptations! What worked for you? What should we all try? 

Eat well, friends! 
- Deidre


Tuesday, July 8, 2014

York Community Food Pantry to Receive First Foodprint Donation from Maine Companies Maine Manufacturing, Cole Harrison


This morning, we here at the Fresh Food Frenzy Project are gearing up for our next donation to the community, and this time it will be even bigger than our first. Biannually, we offer the companies who receive our weekly fruit4theoffice fruit delivery service an opportunity to choose a local food pantry to be the recipient of all of the foodprints they have accumulated over the six-month period in an effort to show our customers appreciation. Companies collect these foodprints with each fruit box they receive. 

Two of the companies which we work with - Maine Manufacturing and Cole Harrison Insurance - have elected the York Community Food Pantry to be the recipient of their foodprints. The York Community Food Pantry is located in York, Maine and is a branch of the YCSA - York County Service Association - which also offers family services and runs a community thrift shop. Their mission is simple: "To extend hospitality to every York resident who turns to us in need" (YCSA, 2013). The food pantry is open for distribution and to volunteers on Thursdays from 12:30 pm -3:00 pm.  Donations and volunteers are welcomed.

Maine Manufacturing is located in Sanford, Maine and has been in operation since 2007. The company is responsible for the production and supplementation of various products which utilize GVS Filter Technology (GVS Group, 2014). Maine Manufacturing is donating a total of 210 servings of fruit to the York Community Food Pantry.

Cole Harrison Insurance is an independent insurance provider located in Kennebunk, Maine. The company was founded in 1882 and is a Trusted Choice Agent, and is one of the most reputable insurance providers in all of Southern Maine (Cole Harrison, 2014). Cole Harrison is donating a total of 105 servings of fruit to the York Community Food Pantry. 

It is because of our loyal customers like Maine Manufacturing and Cole Harrison Insurance that we were able to found the Fresh Food Frenzy Project this Spring. We hope to see this project continue to grow and make an impact in our surrounding Southern Maine communities. If you are interested in learning more about the Fresh Food Frenzy Project or signing your company up for weekly fruit4theoffice deliveries, visit our website at freshfruitfrenzy.com.